Project documentation made easy!

Table of Contents
Here I’ll show you how you can easily create a documentation system for your project using Python.
Creating project documentation#
Every now and then you have a really cool project that you want to share with the world but your only documentation for it is the README of your repository? How about creating a website page to be the documentation of your project? Even better, here I’ll show you how you can do that and host it for free!
Let’s get down to work and make it.
Setting Up GitHub#
First of all, let’s create a repository to host our files. The first thing is pretty simple, go to GitHub and click the green button New on the top left side of the page. In case you don’t have a GitHub account you can create one here.
For this post, I’m going to create one called dev-to-docs.
MkDocs#
Now we’ll configure our MkDocs, the system that will create the pages for our documentation. For further information about MkDocs you can check their documentation. To manage our Python packages I’ll use pipenv, but feel free to use the one you like the most!
Let’s install and initialize our project’s Python environment:
sudo apt install pipenv # make sure to use the package manager of your distro!
pipenv --three # creates the environment with Python 3
With our environment created (pipenv will create the necessary files), let’s install our dependencies:
pipenv install mkdocs==1.6.1
pipenv install mkdocs-material==9.7.1
pipenv install --dev black==25.12.0 # for some code formatting
We should be good to create our MkDocs project now:
pipenv shell # activate our environment
mkdocs new dev-to-docs
This will generate the following tree:
.
├── dev-to-docs
│   ├── docs
│   │   └── index.md
│   └── mkdocs.yml
├── Pipfile
└── Pipfile.lock
Our base system is ready! If you want to check it on your local machine you can type:
cd dev-to-docs # Go to the root folder of the mkdocs.yml
mkdocs serve
MkDocs will serve the system locally, usually at http://localhost:8080 or 127.0.0.1:8080.
Customizing your system#
In the file mkdocs.yml you have all the configuration for your page. There you can set your project name, the theme, a link to a repository and more. For a full list of the possible settings you can check on MkDocs: Settings page.
There are also some more settings related to the material design of MkDocs. Most of the customizations here are related to the look & feel, but explore as much as you want the options here MkDocs Material: Settings.
For this example the system looks like:
site_name: Article Documentation - Docs
site_description: Example project for Documentation system.

repo_url: https://github.com/sconetto/dev-to-docs
repo_name: sconetto/dev-to-docs

edit_uri: edit/main/docs/

theme:
  name: material
  icon:
    repo: fontawesome/brands/github
    logo: fontawesome/solid/users-line
  font:
    text: Fira Sans
    code: Fira Mono
  palette:
    - teal: "(prefers-color-scheme: light)"
      scheme: default
      primary: red
      accent: indigo
      toggle:
        icon: material/lightbulb-outline
        name: Switch to dark mode
    # Dark mode
    - media: "(prefers-color-scheme: dark)"
      scheme: slate
      primary: indigo
      accent: red
      toggle:
        icon: material/lightbulb
        name: Switch to light mode
  features:
    - navigation.instant
    - navigation.expand
    - navigation.top

extra:
  social:
    - icon: fontawesome/brands/linkedin
      link: https://www.linkedin.com/in/sconetto/
      name: Sconetto's LinkedIn
    - icon: fontawesome/brands/github
      link: https://github.com/sconetto
      name: Sconetto's GitHub

copyright: Copyright © 2026 - 2026 João Pedro Sconetto

markdown_extensions:
  - markdown.extensions.toc:
      slugify: !!python/object/apply:pymdownx.slugs.slugify
        kwds:
          case: lower
  - pymdownx.arithmatex
  - pymdownx.betterem:
      smart_enable: all
  - pymdownx.caret
  - pymdownx.critic
  - pymdownx.details
  - pymdownx.emoji:
      emoji_generator: !!python/name:pymdownx.emoji.to_svg
  - pymdownx.inlinehilite
  - pymdownx.magiclink
  - pymdownx.mark
  - pymdownx.smartsymbols
  - pymdownx.superfences
  - pymdownx.tasklist:
      custom_checkbox: true
  - pymdownx.tilde
  - footnotes

nav:
  - Home: index.md
  - Solution:
      - Overview: solution/overview.md
      - Architecture: solution/architecture.md
  - Modules:
      - Auth API: modules/api-auth.md
      - Paycheck API: modules/api-paycheck.md
      - Register API: modules/api-register.md
      - Vacation API: modules/api-vacation.md
      - Human Resources UI: modules/front-register.md
  - Interfaces:
      - About Interfaces: interfaces/about.md
      - Auth API Blueprint: interfaces/api-auth.md
      - Paycheck API Blueprint: interfaces/api-paycheck.md
      - Register API Blueprint: interfaces/api-register.md
      - Vacation API Blueprint: interfaces/api-vacation.md
  - About: about-rh.md
In this example file there are plenty of customizations, changes in the color palette, a dark and light mode, different icons, fonts and so on. Most importantly, the navigation is a custom one. This can be achieved by using the nav option and creating the desired navigation tree.
In case you don’t want to have a custom navigation, just place the documents (markdown files) inside the docs folder. Any sub-folder that this folder has will be considered as the structure of the document (this way you can organize the level of the documentation).
Adding content#
To add new pages to the system is really simple, you just need to add a markdown file inside the docs folder and write your content there. It supports every feature of markdown, including code highlighting, images, links, etc.
If you want a quick reference of basic syntax and a cheat sheet check this page from Markdown Guide, Markdown Cheat Sheet.
An example of a page extracted from docs/about-rh.md:
# About the HR Project Documentation

In this repository there is an instance of a framework proposal for the
documentation of systems built using microservices, as proposed in the
paper **Microservices Documentation Proposal**[^1]. Therefore the navigation
represents an instance in a case study of the HR system, in which it was
tested for framework validation in the article.

In this framework, the documentation is built according to the desired view.
The following structure describes how the structure of the documents in this
system is arranged according to the strategy of the views:

- `Solution` - Documentation of the software design solution level.
- `Modules` - Documentation of individual architecture modules.
- `Interface` - Documentation of module interfaces and system interactions.

[^1]: Insert article full text link.
Remember if you have a custom navigation you need to update mkdocs.yml and indicate the path of the added file to your navigation.
Observation: This example has the extension for footnotes, this can be used by adding [^n] in the text and then at the end [^n]: some text, where n indicates the number of the footnote.
Publishing your system#
Finally, now that we have everything set up, customized and with our awesome documentation we just need to deploy it. For that we’re going to use GitHub Pages and GitHub Actions, it’ll make the process free and simple.
First of all let’s create and configure our GitHub Action, for that we will create a YAML file and place it in a folder called .github/workflows:
name: deploy-action
on:
  push:
    branches:
      - master
      - main
jobs:
  deploy:
    runs-on: ubuntu-latest
    steps:
      - uses: actions/checkout@v6
      - uses: actions/setup-python@v6
        with:
          python-version: '3.12'
          cache: 'pipenv'
      - name: Install pipenv
        run: curl https://raw.githubusercontent.com/pypa/pipenv/master/get-pipenv.py | python
      - run: pipenv install
      - run: cd dev-to-docs && pipenv run mkdocs gh-deploy --force
This will run on every push to the master or main branch, it’ll install the dependencies, generate our website and deploy it in the gh-pages branch.
You may need to manually activate GitHub pages on the settings of your repository, just go to Settings > Options > GitHub Pages. Select the source to be the branch gh-pages and the rest should be automatic. In case you have a custom domain you can change it here as well.
Your settings will look something like this:
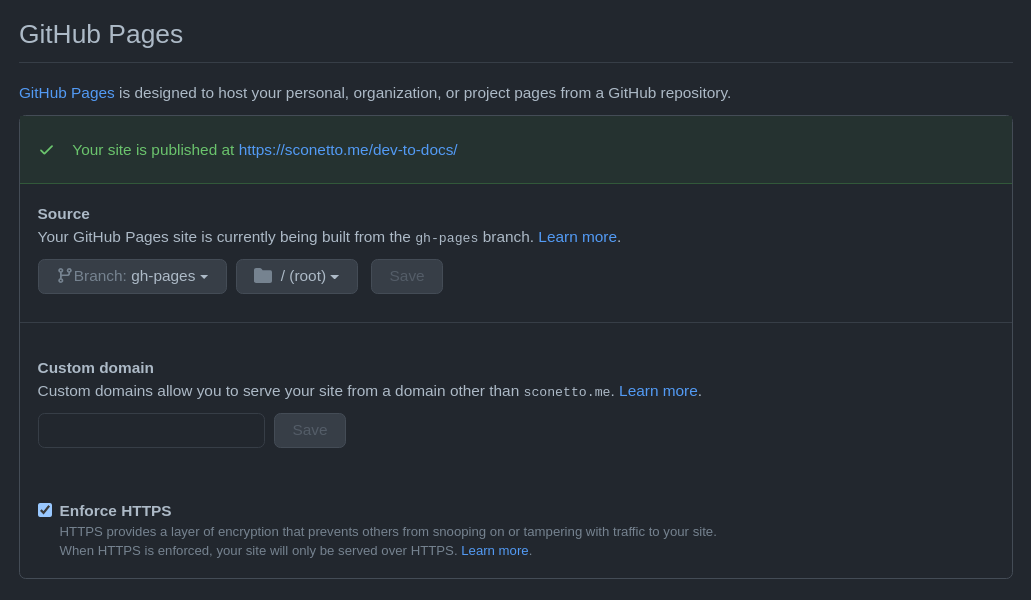
Your documentation should shortly appear at <username>.github.io/<repository> or at custom.domain/<repository>, in case you set a custom domain for the page.
It may be necessary to create a personal access token when deploying, which can be done using GitHub Secrets.
That’s it! All done. If you got here you probably have a system up and running, which will be automatically deployed at every new change to your main branch and accessible to everyone through a page.
In case you want to check the example system:
The repository with the code of the example can be found at sconetto/dev-to-docs or in a link present in the system navbar at the top right corner.
Thanks for reading and we’ll catch up in the next one 🧑🏻💻